There is no sound more frustrating in a factory than the hiss of leaking air—or worse, the silence of a machine that has stopped working.
When a pneumatic solenoid valve fails, production halts. Every minute of downtime costs you money. But before you panic and order a completely new system, take a breath. Most solenoid valve problems—whether it’s air leaking, a stuck spool, or a burnt coil—are simple to diagnose and often easy to fix.
In this guide, we will walk you through the 5 most common solenoid valve failures. You will learn how to troubleshoot them step-by-step, helping you decide whether to repair the issue or replace the part to get your equipment back up and running fast.
Before You Start: Safety & Tools
Troubleshooting pneumatic components involves pressurized air and electricity. Safety is your first priority.
- De-energize: Always turn off the electrical power supply to the valve.
- Depressurize: Shut off the air supply and exhaust any residual pressure in the lines.
What You Will Need
To troubleshoot effectively, gather these basic tools:
- Multimeter: Essential for testing if a solenoid coil is burnt out.
- Small Screwdriver: For manual override testing and disassembly.
- Clean Cloth & Compressed Air: To clean debris from the valve spool.
- Silicone Grease: For lubricating O-rings during reassembly.
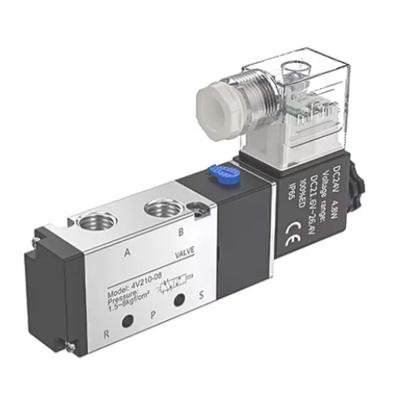
$$Image Placeholder: Labeled diagram of a pneumatic solenoid valve showing Coil, Armature, Spool, and Pilot$$Image Alt Text: Internal diagram of 5/2 way pneumatic solenoid valve components including coil and spool.
Problem 1: Air Leaking from Exhaust Port
This is arguably the most common issue in pneumatic systems. You hear a constant hissing sound from the exhaust port (or muffler) even when the valve is in a neutral state. This “blow-by” wastes energy and drops system pressure.
Why is it happening?
- Worn Seals (O-rings): Inside the valve, the rubber O-rings on the spool may be cracked, flattened, or worn out due to age or friction.
- Debris: A tiny piece of metal shaving, Teflon tape, or dirt might be lodged between the spool and the valve body, preventing a tight seal.
- Dry Operation: Lack of lubrication can cause seals to degrade faster.
How to Fix It
- Disassemble: Carefully remove the pilot assembly and slide out the spool.
- Clean: Wipe the spool and the internal bore with a clean cloth. Remove any visible debris.
- Inspect Seals: Look for cuts or flat spots on the O-rings. If they are damaged, lubrication won’t help—they need to be replaced.
Pro Tip: While seal kits are available, finding the exact match for an older valve can be time-consuming. In many cases, it is faster and more cost-effective to replace the entire unit with a new 5/2 Way Pneumatic Solenoid Valve to ensure reliability.
Problem 2: Valve Won’t Open (No “Click” Sound)
You send an electrical signal, but nothing happens. The cylinder doesn’t move, and you don’t hear the characteristic “click” of the solenoid engaging.
Step 1: The “Manual Override” Trick
Before you grab your multimeter, check the Manual Override Button. This is a small button (usually red or flush with the body) on the pilot head.
- Press it: If the valve activates manually, the mechanics are fine. The problem is electrical (bad coil, wiring, or controller).
- If it doesn’t move: The spool is mechanically stuck (see Problem 3).
Step 2: Check the Solenoid Coil
If the manual override worked, the issue is likely a burnt-out coil or bad wiring.
- Check Voltage: Ensure your power supply matches the coil rating (e.g., don’t feed AC power to a 24V DC Coil).
- The Multimeter Test: Set your multimeter to measure resistance (Ohms/Ω). Touch the probes to the coil terminals.
- Reading = 0Ω: The coil is shorted. Replace it.
- Reading = Infinity (∞): The internal wire is broken (Open circuit). Replace it.
- Reading = Specific Value: If you get a steady reading (e.g., 20Ω to several hundred Ohms depending on voltage and wattage), the coil is good, and you should check your wiring or PLC output.
Problem 3: Valve Stuck Open or Closed
Sometimes, the solenoid coil is working perfectly (you hear the click), and the manual override feels loose or jammed, but the valve simply refuses to switch positions.
Why is it happening?
- Dirty Air (The #1 Culprit): Compressed air is often full of moisture, rust from old pipes, and compressor oil. This mix turns into a sticky sludge that jams the spool.
- Swollen Seals: Using the wrong type of lubricant (like WD-40 or incompatible oil) can cause rubber seals to swell, locking the spool in place.
- Broken Spring: The internal return spring might have snapped, preventing the valve from resetting.
How to Fix It
- Clean the Spool: Remove the spool and wipe away the sludge using a lint-free cloth.
- Lubricate: Apply a thin layer of silicone grease (ensure it is compatible with your seals, typically NBR or Viton).
- Prevent Recurrence: Cleaning the valve is only a temporary fix. If your air supply is dirty, the valve will jam again next week.
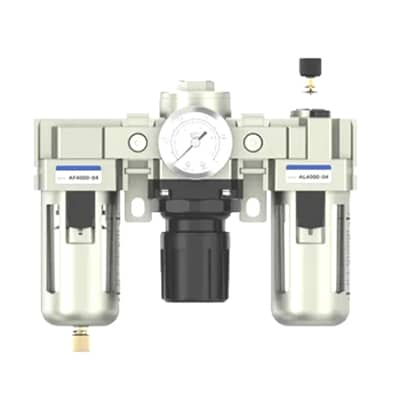
Prevention Tip: To stop debris from entering your system, always install an Air Filter Regulator (FRL) Unit upstream. This small investment protects your entire pneumatic system from moisture and dirt.
Problem 4: Humming or Buzzing Noise
If your valve sounds like an angry hornet, it is likely an AC (Alternating Current) solenoid valve. While a slight hum is normal, a loud buzzing noise indicates a problem.
Why is it happening?
- Gap in the Armature: AC solenoids rely on a perfect magnetic seal. If dirt or rust gets between the armature (plunger) and the core, the magnetic field fluctuates 50 or 60 times a second (50/60Hz), causing vibration and noise.
- Loose Coil Nut: The nut holding the coil to the stem might have vibrated loose.
- Low Voltage: If the voltage drops below 85% of the rating, the magnetic force may not be strong enough to hold the armature seal tight.
How to Fix It
- Tighten Up: Check the top nut and ensure the coil is seated firmly.
- Clean the Core: Remove the coil and armature tube. Clean the flat metal surfaces where the magnetic parts meet. Even a single grain of sand can cause a buzz.
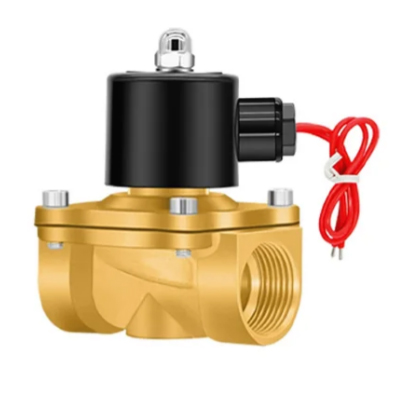
Upgrade Idea: Tired of the noise? DC (Direct Current) Solenoid Valves operate silently and run cooler than AC versions. Consider upgrading to a 24V DC Solenoid Valve for a quieter, more reliable operation.
Problem 5: Low Pressure or Sluggish Operation
If your cylinder is moving slowly or lacks force, the solenoid valve might not be fully shifting. This is often a pressure issue, not a valve defect.
Why is it happening?
- Low Pilot Pressure: Most industrial solenoid valves are Internally Pilot Operated. This means they use the air pressure itself to help shift the spool. If your system pressure drops below the minimum requirement (usually around 20-30 PSI or 0.15-0.2 MPa), the valve simply won’t have the strength to open.
- Undersized Tubing: Using a ¼” tube on a large valve restricts flow, starving the cylinder of air.
- Leaking Fittings: Air escaping from loose connections drops the pressure before it reaches the valve.
How to Fix It
- Check the Gauge: Ensure your regulator is set above the valve’s minimum operating pressure.
- Inspect Connections: Spray soapy water on your Pneumatic Fittings. If bubbles appear, the fitting is leaking and needs to be reseated or replaced.
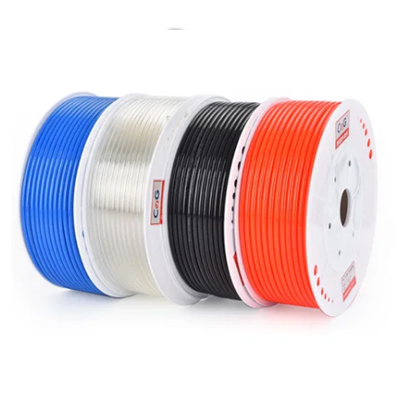
- Upgrade Flow: If the valve is fine but the action is slow, consider upgrading to larger Polyurethane (PU) Tubing to increase flow rate.
Quick Troubleshooting Summary
Save this table for a quick reference next time your system goes down.
| Symptom | Likely Cause | Quick Fix |
|---|---|---|
| Air Hissing from Exhaust | Worn O-rings or debris on spool | Clean spool or replace Seal Kit |
| No Click / Won’t Open | Burnt coil or bad wiring | Test with multimeter; replace Solenoid Coil |
| Stuck / Jammed Valve | Dirty air / Sludge build-up | Disassemble & clean; install FRL Unit |
| Loud Buzzing Noise | AC coil vibration / loose nut | Tighten nut; clean armature; upgrade to DC Valve |
| Sluggish Movement | Low pilot pressure (<30 PSI) | Increase system pressure; check Fittings for leaks |
Conclusion: Repair or Replace?
Now that you’ve diagnosed the problem, you have a decision to make.
When to Repair: If the issue is simply dirt or a loose connection, a quick cleaning is the best solution. It costs nothing but your time.
When to Replace: If you found a burnt coil, a cracked valve body, or worn-out seals that are hard to source, stop wasting time. The cost of downtime often exceeds the price of a new valve.
- Check Your Environment: Did the valve fail because of moisture or heat? If so, don’t just replace it with the same model. Consider upgrading to a High-Temperature or Waterproof valve to prevent future failures.
Ready to get your machine back online?
Don’t let a $20 part stop a $20,000 production line. Browse our full catalog of high-performance pneumatic solenoid valves, in stock and ready to ship.


